In the rapidly evolving landscape of Kubernetes security, understanding and implementing effective strategies to safeguard your clusters is paramount. Kubernetes Security Posture Management (KSPM) plays a crucial role in this endeavor, offering a robust framework for protecting against common attack vectors, responding to incidents, and ensuring a deep layer of defense through a defense-in-depth strategy. This comprehensive guide is a one-stop resource for hardening your Kubernetes clusters, enhancing incident response capabilities, and implementing defense-in-depth measures.
Table of Contents
Fundamental Hardening Techniques
KSPM begins with the implementation of "cyber hygiene" practices aimed at preventing the most common attack vectors against your cluster. At the heart of Kubernetes security is the concept of "cyber hygiene," which refers to the foundational practices designed to prevent the most common and potentially devastating attacks. Central to this effort is securing the Kubernetes control plane, which, if exposed, can serve as a prime target for attackers.
Strategies such as removing external access to the control plane, securing Kubernetes authentication processes, and employing Role-Based Access Control (RBAC) to restrict privileges, are essential first steps.

Common Kubernetes Misconfigurations and How to Avoid Them
Ever seen those advertisements for posture training devices? They are designed to alert you when you are standing or sitting in a way that puts extra strain on your neck and spine. The concept of “posture” also applies to cyber security. In this case, bad security posture potentially impacts your ability to respond to new and emerging threats because of extra “strain” on your security capabilities caused by misconfigurations, gaps in tooling, or inadequate training.
Security Posture Management can be applied to different areas of your organization’s technical landscape, including the cloud (CSPM) and Kubernetes (KSPM). Here we will describe some of the most common misconfigurations, specific to Kubernetes, that you will want to avoid. We’ll provide suggestions for improving your posture, following a “crawl, walk, run” maturity model.
Secure the Control Plane and API Access
One of the most important Kubernetes security measures you can take is often missed because the control plane is exposed by default in many managed Kubernetes services. Removing external access to the control plane and API provides an instant, high level of security against exploits targeting vulnerabilities in control plane components. Attackers now need to either chain those vulnerabilities to exploits of exposed running workloads or compromise the account of someone with internal access to the control plane. Both of these attack vectors are possible, and you’ll need additional security measures for both. But taking the control plane offline is like locking your front door: a motivated thief can drill through the deadbolt, sure, but 90% or more simply won’t. Of course, you will still need access to your cluster, so you’ll need a way in while the control plane is offline. Here are some options for facilitating that:
Crawl
Use a Bastion Host— an internet accessible server in the same private network as your cluster but not joined as a node— as the gateway to your cluster. Ideally, you spin the bastion up when needed, then shut it down when you don’t to minimize its exposure, too.
Walk
Use a Cloud provider service to facilitate secure connections. For example, AWS customers can use System Manager (SSM) to connect to nodes in the cluster without a public IP. This uses AWS’s IAM service to handle authentication and authorization.
Run
The Zero Trust way: use an identity-aware proxy to broker access to the nodes in your network without making them available to the public internet. This can then tie into your existing identity provider and authorization system.
Strengthen the Kubernetes Authentication Process
Once someone has network connectivity to your cluster, step two is authenticating to the cluster to assume a role. Kubernetes largely outsources authentication— it does not even have an API object for “normal” users. Instead, it assumes you will handle authentication of users before they reach the cluster. You tell the cluster the type of authentication material to expect and where to expect it from. The cluster then trusts any assertions found in valid (ie, properly sourced and signed) authentication materials that are provided.
Further, Kubernetes does not support revoking authentication material, so the provided materials must be set to expire by the provider. This puts the burden for securing authentication entirely on whatever external authentication system you adopt.
Once authenticated, authorization is handled natively via Kubernetes RBAC. Kubernetes accepts x509 certificates and bearer tokens as valid authentication materials. This gives you a few ways of generating and securing the necessary materials.
Crawl
Use your cloud provider: if you are using a managed Kubernetes service, your cloud provider may have a way of translating its native authentication protocol to a bearer token for Kubernetes authentication. This moves the problem back one step: now you need to protect authentication to your cloud provider (ideally using SSO from your existing IdP).
Walk
Use your existing IdP: Kubernetes supports OIDC for authentication, so if your IdP is an OIDC provider, you can use it to authenticate directly to the cluster (rather than using it to authenticate to the cloud provider and then using the cloud provider to authenticate to the cluster).
Run
The Zero Trust way: Zero Trust architectures broker access through identity-aware proxies. If you have configured your cluster nodes to only be accessible via Zero Trust, you’ve already established an identity when you connect to those nodes. You can use the same Zero Trust architecture to establish your identity to the cluster itself.
Enforce the Principle of Least Privilege through RBAC
Role Based Access Control (RBAC) is intended to help enforce the Principle of Least Privilege. A corollary of this is that roles and groups with expansive privileges should be narrowly restricted in their assignment (and ideally used by those assigned only when necessary). This means restricting who has access in your cluster to powerful roles (ie, admin) and groups (system:masters, for example). The system:masters group in particular should be limited to break-glass scenarios when other ways of accessing or controlling the cluster have been lost.
Crawl
Restrict privileged access to a group: This is the essence of what RBAC requires: privileged access is limited to only those who need it.
Walk
Require elevation: The next step in tightening down privileged access is to make it a regular practice for members of the privileged access group to use a lower privilege account except when they need higher ones. This requires them to re-authenticate with a more privileged account. This brings two advantages: first, an added layer of protection for privileged access, and, second, a more clear audit trail for all privileged activities.
Run
Restrict privileged access to break-glass only: This pairs especially nicely with a GitOps deployment and management system (see next item). In essence don’t give out access to admin or otherwise privileged accounts, keep the credentials for them in a secure place only to be used in a break-glass scenario.
Use GitOps to Deploy and Manage Clusters
The idea behind GitOps is that all changes in your cluster are handled through changes (managed by git) to your Configuration as Code (CaC). As a result, there should be no manual changes made in the cluster. This may sound at first like a radical application of the Principle of Least Privilege, perhaps even taking it to its logical extreme. But it turns out GitOps has benefits well beyond security (and actually, the security benefits may be a happy accident). GitOps provides predictability and stability to cluster deployments. It also ensures admins know the state of the cluster (ie, there hasn’t been configuration drift) and maintains parity between test and production clusters built off the same codebase. Of course, it also has the security benefit of dramatically reducing the number of users with “write” access in the cluster. Thats pretty nice, too.
Crawl
Deploy with a simple CICD job: When your pipelines are approved and you merge to main, run a simple “helm upgrade” job. This is easy to implement, but requires giving your CICD system at least one (possibly more, depending on how your CaC is organized) fairly privileged account in your cluster.
Walk
Use a GitOps Operator: Instead of pushing out changes directly from your CICD, this approach pulls changes in using an operator in the cluster that is watching your git repos for changes. Now instead of granting your CI tooling credentials for your cluster, you grant the single operator already running in your cluster read-access to your relevant CaC repos.
Run
Make by-hand changes break-glass only: Once your GitOps workflow is going smoothly, there shouldn’t be a need for user roles in your production clusters that can make manual changes. Dev, test and (possibly) staging clusters should probably never reach this level of “maturity,” as part of the point of those is trying things out.
Prevent Container Escapes by Limiting Privileges
Underneath it all, the Kubernetes lifecycle is composed of Kubernetes workloads running as containers. Those containers, in turn, run as processes on a host. Those processes have privileges (as do any process running on a host) derived from a combination of the user on the host running the container and the user declared inside the container running the tasks/processes of the workload.
There are therefore two ways to limit the privileges granted to a workload: first, run the container under a non-privileged (ie, not root) user on the host, and second, run the workload in the container as a non-privileged user.
Ultimately, if an attacker manages to “escape” a container, they will inherit the host-user’s privileges, so the first prong is arguably more important. However, even a less privileged host user will have some important privileges (like, for example, the ability to run other, ie, malicious, containers). It is therefore desirable to minimize opportunities for container escapes of any kind. You can make container escape much harder by using a non-root user for the workload inside the container.
Crawl
Audit your containers: The first step is to know what you have running in a privileged mode. Then you can begin removing privileges from workloads that don’t need it.
Walk
Use an Admissions Controller: Start enforcing restrictions on privileged containers with an admissions controller rule to prevent containers running in privileged mode from running at all.
Run
Check privileges during CICD: Evaluate containers for the use of root users during your CICD pipelines so that developers can fix the permissions before attempting a deployment.
The many misconfigurations possible in Kubernetes highlight the importance of KSPM in drastically reducing your attack surface. Since Kubernetes spans both the build as well as runtime, any discussion of KSPM must include incident response.
The next section will show how to set yourself up for incident response using KSPM.
Enhanced Incident Response
Moving beyond hardening, the focus shifts to how KSPM can support incident response within Kubernetes clusters.
This involves leveraging Kubernetes' own mechanisms and external tools to detect, contain, and mitigate security incidents effectively. Key to this process is the implementation of cluster logging and real-time monitoring, which together enable the tracking and analysis of anomalous activities potentially indicative of security breaches.
Utilizing an admission controller is another pivotal aspect, allowing for the enforcement of security policies at the time of deployment. By setting policies based on best practices, such as the OWASP Top 10 for Kubernetes, organizations can prevent the deployment of non-compliant or potentially malicious resources, thereby adding a proactive layer of defense.
Tying KSPM to Incident Response
What happens if there is an incident in your clusters? How would you identify the incident? How could you contain it? And what is the overall level of “responsiveness” in your security posture?
Responsiveness will, in some ways, build upon the basic cyber hygiene we discussed earlier.
For example, in a serious security incident, you may need to invoke the “break glass” roles we discussed in the Kubernetes RBAC section.
A few other Kubernetes security posture measures will improve your ability to detect and respond to real incidents in your cluster.
Once again, we’ll provide suggestions, following a “crawl, walk, run” maturity model.
Advanced Misconfiguration Remediation for Incident Response
Enable and Use Cluster Logging
Kubernetes logging is not just a security requirement. Logging is also a requirement for effective DevOps, providing the feedback developers need to drive bug-fixes and new releases based on the actual use of their apps and the bugs their users encounter. Logging also supports the work of SRE teams, helping them identify the root cause of an outage and work with developers on a fix.
Similarly, when a possible security incident emerges, your security team will need to be able to trace activity through the logs to determine its nature, severity, and extent.
Kubernetes by default collects system component and container runtime logs, storing them on the local filesystem and rotating them based on the cluster’s configuration.
This is a good start, but ideally, you will want to aggregate the logs somehow so that you can more easily monitor and search them.
Crawl
Use the Kubernetes Default: Kubernetes by default collects many important logs on the local file system of your nodes. You can search those logs using kubectl logs commands. That gets you started!
Walk
Deploy a logging agent: A logging agent allows you to (a) collect more logs, (b) sort and filter those logs based on your priorities, and (c) aggregate logs into a common storage archive for searching and analysis.
Run
Aggregate logs to a SIEM: If you are collecting logs into a single storage archive, the next step is to push them into a SIEM solution. This will allow you to organize, index, and search across them more easily.
Have Real-Time Monitoring in Your Cluster
Human-based log analysis is necessary when you are retrospectively analyzing a security incident. Detecting that incident in the first place requires a degree of real-time monitoring and correlation. You can do some of that “manually” with well crafted dashboards, queries, and alerts in something like a SIEM solution, but it requires tremendous time and energy to surface the right information.
To have a truly responsive security posture, you need something to automate that real-time monitoring and analysis and respond to events as they happen.
Crawl
Deploy a Detection and Response tool: The first step is deploying a tool that is able to analyze activity in your cluster and make real-time judgements on what it sees. Just deploying the tool with its default detection posture is a win.
Walk
Start tuning the detections based on your cluster: Any real-time detection and response tooling has to make judgment calls based on the presence of certain known factors. If your cluster has things like internal apps the tool has never seen before, lift-and-shift legacy software that might not act in the most Kubernetes “normal” way, or other features that could be “unusual”, you’re going to get a lot of false positives.
The next step is tuning the detections based on your actual cluster so that you have a better signal-to-noise ratio.
Run
Actively monitor with real-time KSPM: Detection and response tooling is usually configured to generate an alert whenever it finds something it thinks is out of the ordinary. The thing is, someone has to see and respond to that alert. Email is great, but how often have you seen an email exactly when it came in?
The next step is to actively monitor those alerts and whatever other telemetry the tooling is giving you so that you reduce your response time as much as possible. Ensure the misconfigurations you are seeing in Kubernetes are tied in real-time to the Kubernetes lifecycle versus polling intervals so you have full historical context.
Use an Admission Controller for Container Runtime Security
Not all KSPM solutions include admission control, but this is a critical security feature in controlling what is deployed via Kubernetes.
To understand the most basic policies to set, the OWASP Top 10 for Kubernetes is helpful. An admissions controller allows you to enforce policy on Kubernetes objects at deployment time, rejecting those that do not conform to your requirements. It can be used for a variety of purposes, including preventing containers with root permissions from being deployed, verifying artifact signatures before allowing admission, or blocking certain “known-bad” images.
Some admissions controllers can also be used to check existing objects in the cluster for compliance (or can be integrated with a scanning tool that does this), giving you the ability to find and remediate insecure or out-of-compliance cluster resources. The use of an admissions controller provides several pathways to greater responsiveness in your cluster.
You can rely on its existing ruleset to automatically block objects that run afoul of your policies, providing some degree of built-in responsiveness to bad actors attempting to deploy known-bad or non-compliant resources into your cluster.
You can also modify the rules, giving you a pathway for gradually strengthening the security posture of your running workloads. You could even add new rules in direct response to a security threat or incident, giving you another tool as part of your response toolkit.
Crawl: Just deploy one: Get started by deploying an admissions controller with its default rule set. This will provide some degree of protection right out the gate and give you a chance to understand the tool.
Walk: Add a cluster assessment component: This will let you scan your existing workloads against the admissions controller ruleset. It does not eject those workloads, so it’s not a disruptive measure, but it gives you the ability to identify workloads that wouldn’t meet your admissions controller rules and take manual action to remediate.
Run: Begin to write your own rules and do a dry-run before enforcing: Adapt the existing ruleset of the admissions controller based on your specific security requirements and ensure you and your engineering teams understand the impact of admission control policies before enforcing them. As you get comfortable with this, it’ll be easier to add rules on the fly in response to emerging or detected security threats.
Though KSPM is generally more helpful for hardening your clusters versus responding in an incident, there are still configurations and capabilities that can help prevent and respond to incidents, as well as understand the historical context of what happened. Generally, you will need real-time capabilities to excel here, and you will want as much flexibility as possible when dealing with admission control. In the next section, we will discuss more advanced configurations for a defense-in-depth strategy.
What is Defense in Depth and How is It Implemented?
Defense-in-depth is a cyber security concept adapted from military strategy. A defending force doesn’t amass all its defenses in one place or along a single line, it develops “layers” of defense designed to slow down an attacking force and make forward advance too difficult or costly to continue.
In cyber security, we can think of defense-in-depth similarly: our goal is to slow down a cyber adversary, making them work hard for each new “exploit” they might attempt in our environment.
The more difficult it is for an adversary to maneuver in our environment, the more likely we are to detect, contain, and evict them before they can do real damage. The measures outlined in this post are designed for exactly that purpose: slow the adversary down and give defenders the maximum chance to respond.
Strategic Security Layers: Addressing and Preventing Additional Kubernetes Misconfigurations
Protect Your East-West Traffic
While a Kubernetes cluster presents a logical security boundary, it’s important to remember that a cluster is an abstraction over a collection of hosts and the network topologies linking them together. This means that the attack surface for your cluster and the workloads running on it is not limited to the exposed interfaces of those workloads or the Kubernetes API, it also includes the attack surfaces of the underlying hosts and networks on which they run. These present both potential initial access vectors and opportunities for lateral movement. We can substantially decrease this attack surface by using a service mesh to (a) encrypt traffic between services in our cluster (preventing Man-in-the-Middle or replay attacks), (b) mutually authenticate those services to one-another (preventing spoofing attacks), and (c) define limits on what services can communicate with one another (cutting down the potential avenues for lateral movement). A service mesh also gives us another window of visibility into the traffic across our cluster, improving our odds at finding attempts at lateral movement.
Crawl: Go ahead and install that service mesh: The basic deployment of a service mesh will generally bring you encrypted East-West traffic and mutual authentication right out of the box. This isn’t quite as easy as hitting deploy: the services running on your cluster may need some tweaking to work well with the service mesh, but the mesh itself shouldn’t need any modification to bring you these benefits.
Walk: Collect service mesh logs: One benefit of the service mesh is that it provides network log visibility for your cluster. This can be invaluable both in real-time detection and in investigating incidents (ie, the responsiveness we discussed in the last post).
Run: Require apps to define/restrict network connections: The real defense-in-depth benefit from a service mesh comes from using the mesh to restrict allowed network connections on an app-by-app or service-by-service basis. This means that a compromised service can only establish connections with a defined list of other services, limiting the blast radius and the opportunities an attacker has for lateral movement. It also increases the likelihood of detection by creating lots of opportunities for attackers to get it wrong, trying to access services they aren’t allowed to touch and generating noise in the process.
Protect Key Configuration Files
Kubernetes orchestrates workloads by maintaining a list of API objects representing the “desired state” of your cluster. Then, by constantly comparing that desired state with your cluster’s actual state, it “orchestrates” the various systems under its control (container runtimes, networking, etc) to achieve (or at least move closer to) that desired state. Kubernetes uses various configuration files on both control plane and worker nodes to link the cluster together and manage those underlying systems it is orchestrating. Protecting those files from tampering or modification is therefore an important defense-in-depth move to prevent an attacker who already has a foothold in your cluster from being able to escalate their privileges or modify the cluster’s intended state or behavior. The recommended way to do this is by restricting write access on those critical configuration files to the root user.
Crawl: Manually harden critical files: You can literally do this by hand on each node, or you can use a configuration management system like Ansible to apply this hardening across your whole cluster.
Walk: Use hardened node images: Move the process of hardening these files back a layer by baking the hardening of critical files into your image generation process. This ensures the files are hardened from the start when new nodes are deployed.
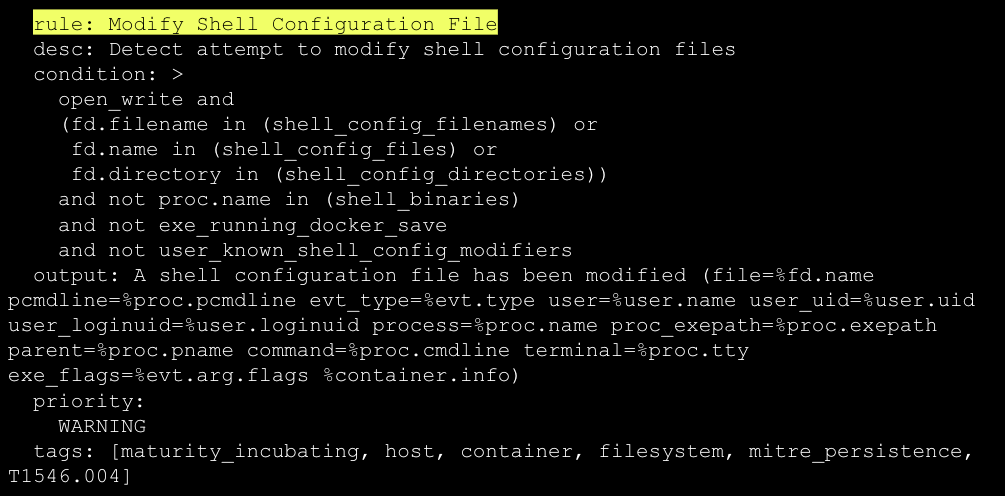
Run: Set up monitoring for attempts to modify critical files: A clumsy attacker who attempts to modify these files should be easy to detect. A more clever attacker will notice the restricted permissions first and attempt an escalation to root. Ideally, a host-based detection system (ie, an EDR) will detect either.
How RAD Security can help with incident detection and response
This kind of issue will be picked up by RAD Security’s Detection & Response capabilities, which combine runtime events with other Kubernetes risks to identify active exploitation.
Below is an example of a rule that would pick up on this kind of a runtime event:
Use an External Secret Store
The most common end-goal of an attacker is to access sensitive information. Whether they intend to lock up that sensitive information (ie, a ransomware attack) or steal it (a data disclosure or theft incident), they ultimately need access to the information first. An important way you can further insulate the data in your cluster from such access is to ensure the keys, passwords, and certificates that protect that data are themselves protected. Kubernetes has a native object for “secrets” of this kind to prevent them being committed openly in your code. However the default for those secret objects is to still be available in plaintext in the cluster, so you need to take additional steps to protect them from prying eyes.
Crawl: Use K8s Secrets: The first step is to actually use Kubernetes secrets objects for storing secrets rather than simply writing those secret values into a config map or other configuration file. This might sound like it doesn’t need to be said, we promise you it does.
Walk: Protect secrets through encryption and RBAC: You can use RBAC to restrict which Kubernetes users can view and/or modify secrets (ideally, there should be no modification because you’re using GitOps). However, remember (see “Protect Key Configuration Files” above) that Kubernetes is only a logical security boundary. If your secrets aren’t encrypted, a user on the host can simply cat the files and view the contents. So you should also encrypt those secrets in the cluster to ensure your RBAC rules hold water.
Run: Use an external secrets operator: Even if you are encrypting and restricting access to secrets, they have to get into your cluster somehow. This provides another possible line of attack to extract your secrets. A further step you can take to defend secrets in your cluster is to store them in a secure secrets backend (the most well known option probably being Hashicorp’s Vault). Then you can use an operator to inject those (encrypted) values into your (RBAC protected) secrets objects in the cluster.
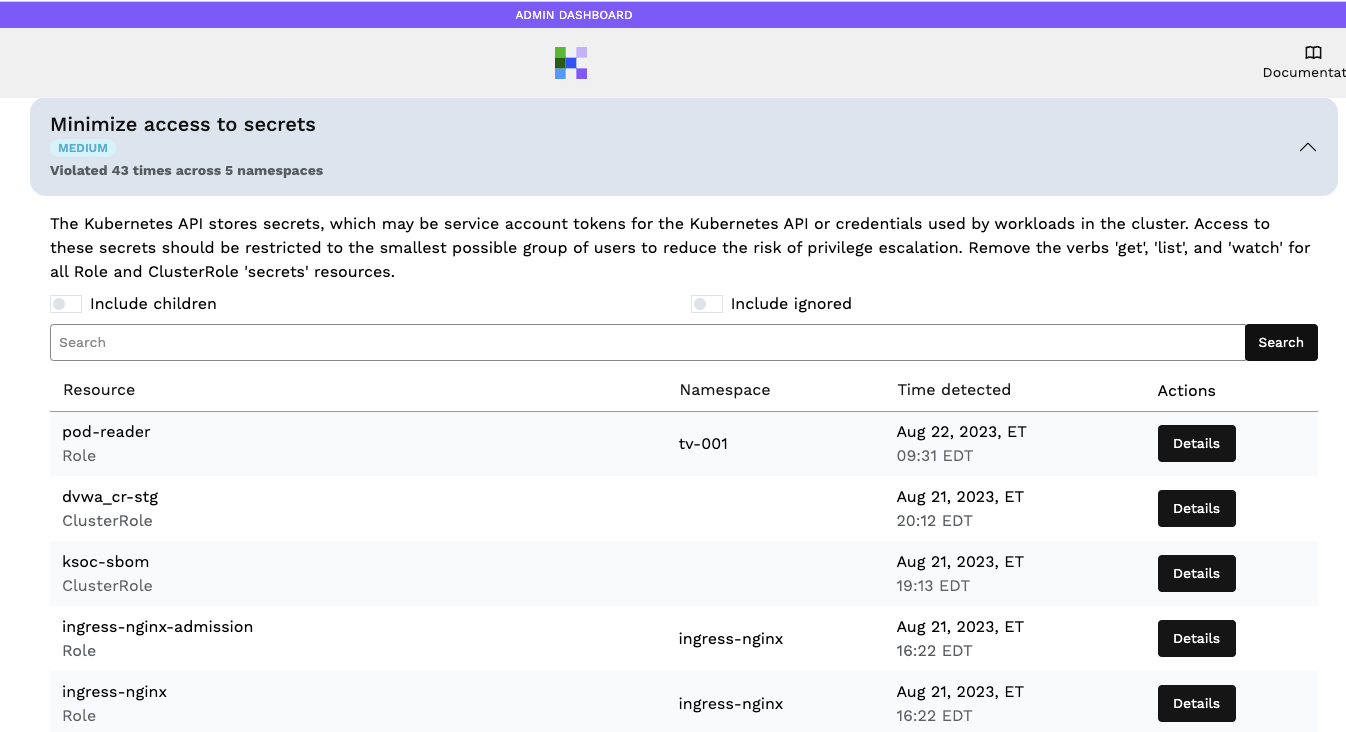
How RAD Security Can Help: RBAC for Secrets
With RAD Security, in seconds you can get a view of RBAC permissions, organized by ‘who can access secrets’ (and other top of mind questions like ‘who can exec into pods’).

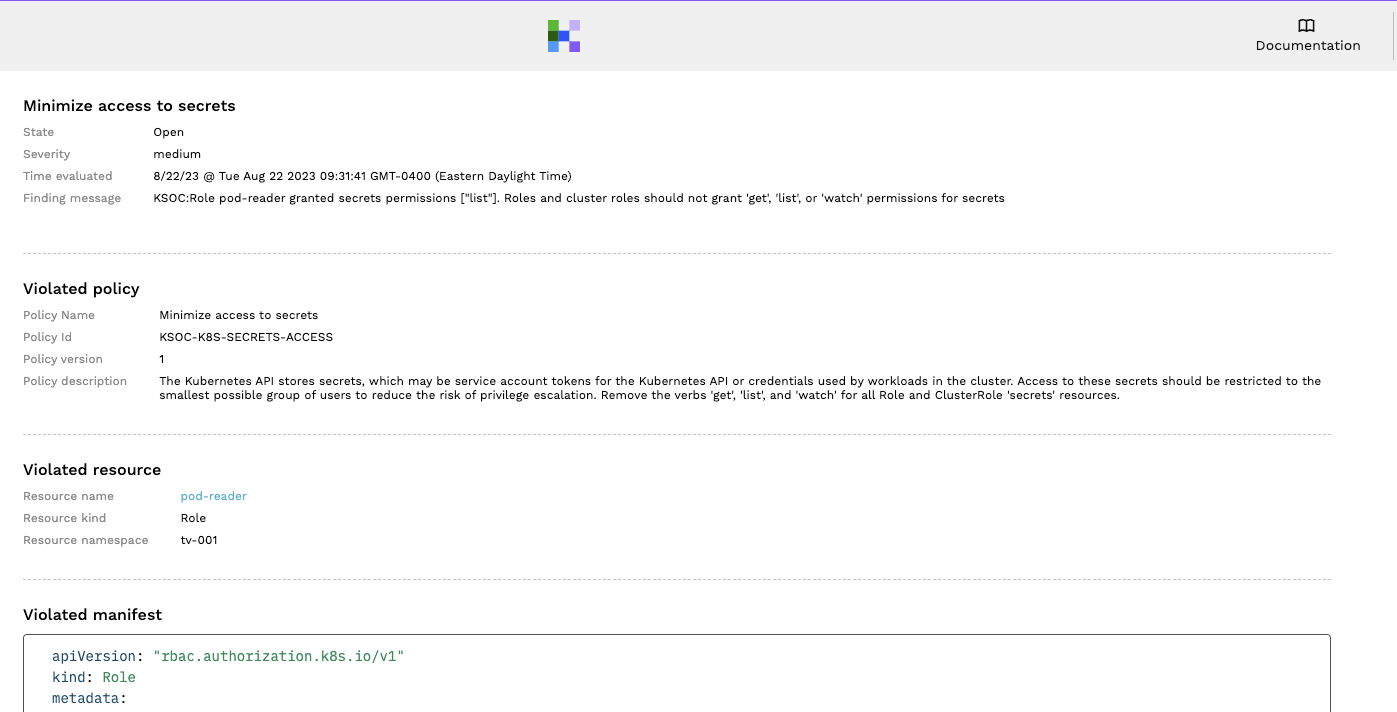
In RAD Security, you can also set policies to receive alerts and notifications when RBAC is over-permissioned to allow access to secrets. See the following example of a policy limiting RBAC controls that has been violated:
Followed by the detailed information to help with remediation:
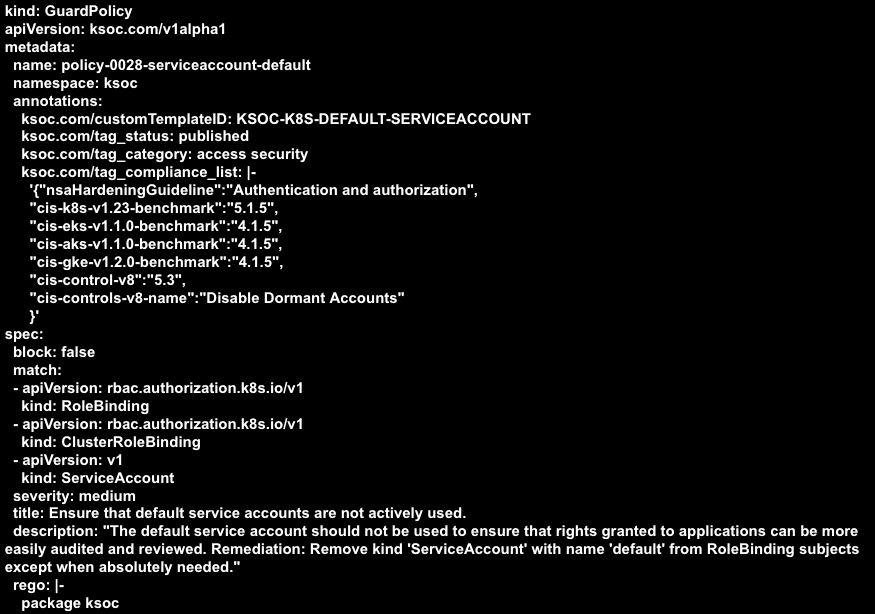
Don't Use Default Service Accounts
If you don’t specify when creating a deployment, Kubernetes will use the “default” service account. The security problem this presents is that, if every deployment is done this way, there is one service account to rule them all. This means that an attacker who successfully gets access to the service account for one deployment now has access to every workload running in your cluster. That’s not good! Instead, deployments should specify a unique service account to run under so that the blast radius of a compromised service account is as small as possible.
Crawl: Take an audit of service accounts: If it has not already been your practice to use separate service accounts for different workloads, you’ll want to start by performing an audit. This may help you identify the highest priorities for remediation.
Walk: Use your admissions controller to enforce a rule: Having a defined service account is something you can check for with your admissions controller. This prevents new workloads from being deployed with the default service account.
Run: Create a CICD check: The thing about using an admissions controller as the only enforcement point is that it’s very annoying to developers to be blocked during deployment. Shifting left by providing a CICD check for not using the default service account helps developers address this problem well before its time to deploy.
How RAD Security Can Enforce Admission Control Policies
RAD Security admission control can be used to enforce a policy that prevents workloads being deployed within a default service account. For example, this admission control policy example that would detect whether a default service account is used in a role binding:
Don't Use Default Namespaces
Similarly to the above, if not specified, Kubernetes will put deployed resources into the default namespace. The implications of this one are a bit more nuanced, however. If all workloads are deployed in the default namespace, this could mean that users with roles provisioned in the default namespace have access to all your workloads, which is perhaps less than ideal from a defense-in-depth perspective. There are two ways to address this.
First, you can add additional restrictions to roles limiting which resources they can access. This is a viable strategy for maintaining RBAC, but it can be tedious to maintain the right lists of restrictions in those roles.
A second option is to deploy workloads in different namespaces. This effectively forces the deployment of additional roles on a namespace-by-namespace (or workload-by-workload) basis, but those roles might be easier to write. However, the namespace boundary is a somewhat permeable one. For example, some cluster resources (ie, Nodes) always exist globally across the cluster and cannot be “namespaced.” This is because namespaces in Kubernetes were not meant to function as a true security boundary but rather as a way of avoiding naming collisions. For example, if every app you deploy has a mysql database service, separating out deployments into different namespaces prevents failures due to two teams naming theirs simply mysql. Using namespaces to create a security boundary works to a point (with the caveats we’ve given) and is a reasonable defense-in-depth strategy.
That said, if you need iron-clad divisions between certain workloads, you’re going to want to run them in separate clusters, not just separate namespaces. Our recommendations here are basically the same as we gave regarding service accounts above:
Crawl: Take an audit of namespaces: This is also a good opportunity to identify the security boundaries you want to enforce.
Walk: Use your admissions controller to enforce a rule: See above.
Run: Create a CICD check: See above.
Audit Namespaces for RBAC Permissions with RAD Security
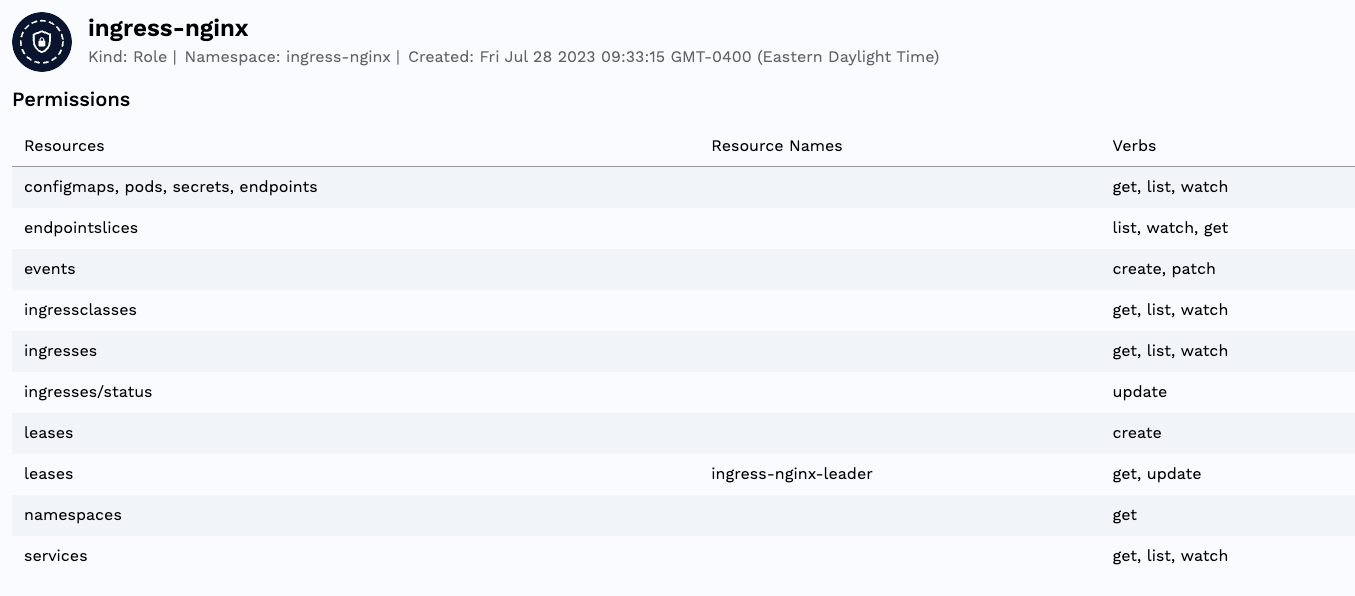
RAD Security's RBAC Explorer provides an easy way to audit namespaces for RBAC permissions. Simply find the namespace you want to look at and the associated kind of RBAC permissions that are available.
Below you will choose your namespace:
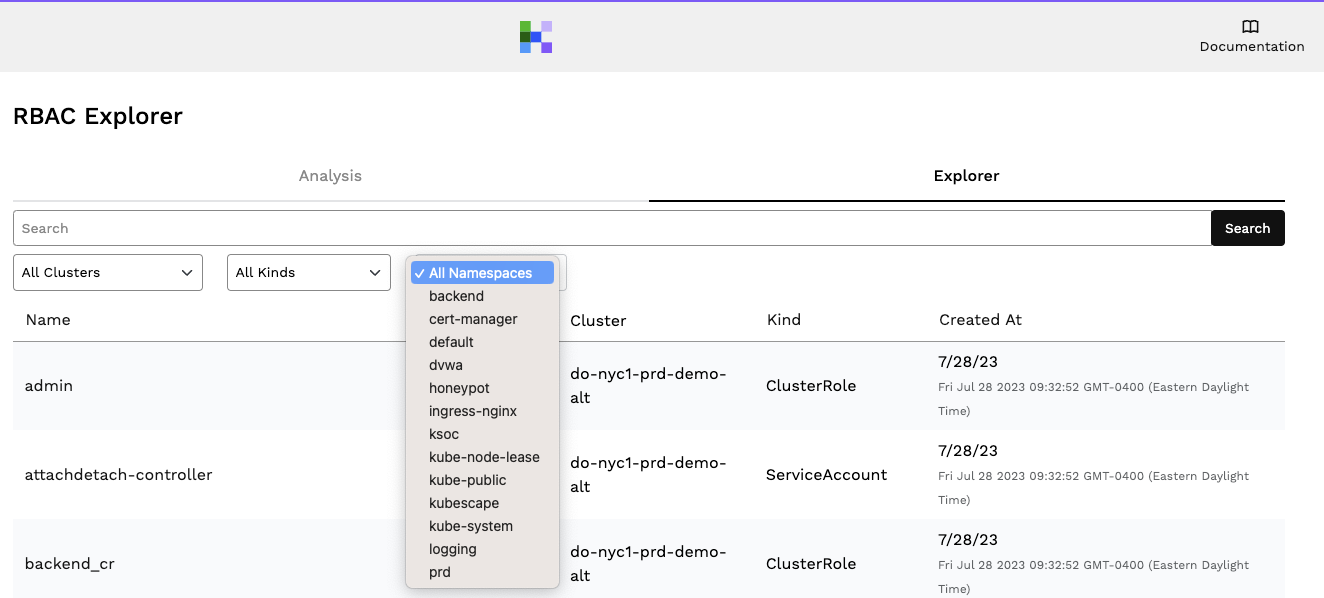
Here you can see all of the resources and permissions associated with that namespace.
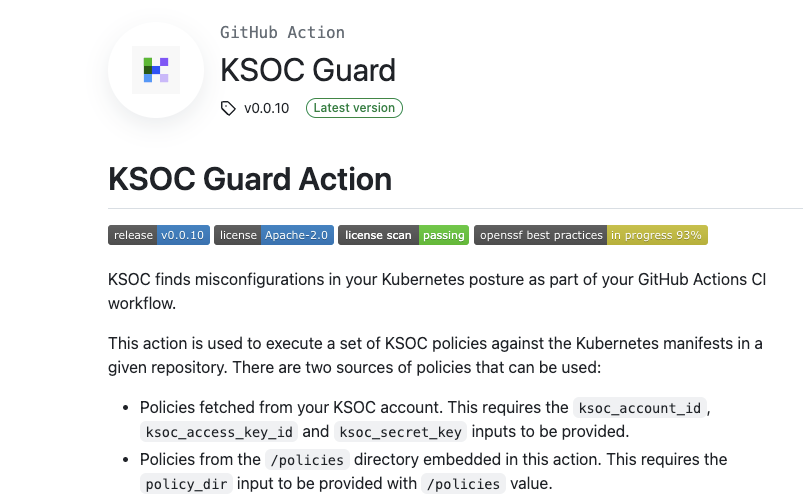
With RAD Security, you can also use Github Actions to enforce the use of namespaces as part of a CI check.
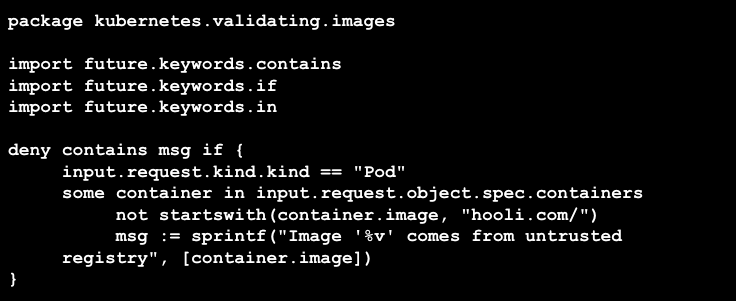
Pull Images Only From Trusted Registries
Kubernetes runs workloads in containers, including many of the “workloads” that make up the cluster’s own control plane. While some things can be done cluster-wide to secure these containers (such as not running containers in “privileged” mode), ultimately how secure any given workload is will largely depend on how secure its underlying container image is. Trusting the security of those container images is a supply chain problem, and solving it largely requires trusting the sources of those container images. This becomes a defense in depth measure because it is much harder for an attacker to deploy a malicious container into your cluster if that container must originate from particular places (especially if those sources are internal to your organization). Setting limits on what registries your cluster can pull images from substantially reduces an adversary’s options.
Crawl: Identify the registries you trust: The prerequisite to establishing limits is knowing what those limits are going to be. This may require auditing existing images in your cluster and their sources.
Walk: Verify image signatures on admission: While not a direct limitation on the registries images can be sourced from, this does limit the images from those registries that can be pulled to ones that are validly signed. Requiring that images be signed and then verifying those signatures on admission cuts out certain classes of supply chain attacks, but it can be “defeated” if the malicious code an attacker wants is itself signed (or included in a validly signed image).
Run: Limit registries via Admissions Control or Network controls: You can write an admissions control rule that checks whether images are pulled from certain registries. This could either (a) block images from certain “untrusted” registries or, (b) only allow images from certain trusted registries (a more ideal state). The regex for these rules can be tricky, so another approach (particularly when allow-listing) can be to use network controls (ie, a hosts file or an egress proxy) to limit what registries the cluster can connect with.
Use RAD Security to Limit the Usage of Unauthorized Registries
RAD Security admission control can limit the usage of unauthorized registries. Below is an example Rego policy, compatible with OPA, that would control the registry used.
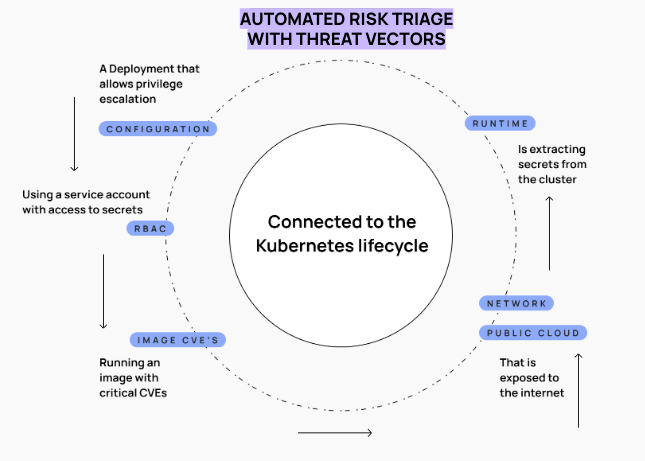
Defense in Depth Using RAD Security Threat Vectors
Threat vectors and automated risk triage are the ultimate defense-in-depth tools for Kubernetes environments, allowing you to get an understanding of risk across runtime, RBAC, image CVEs, Kubernetes misconfigurations, the cloud environment and more all in one view. This gives you clear guidance on how to reduce your blast radius and slow down or altogether stop an attacker.
For the Protect Key Configuration Files guidance above, threat vectors would show runtime alerts around privilege escalation attempts, or attempts to modify critical files in combination with the presence of other risks, like a manifest misconfiguration. So it would be very easy to identify where this has potentially happened in your environment.
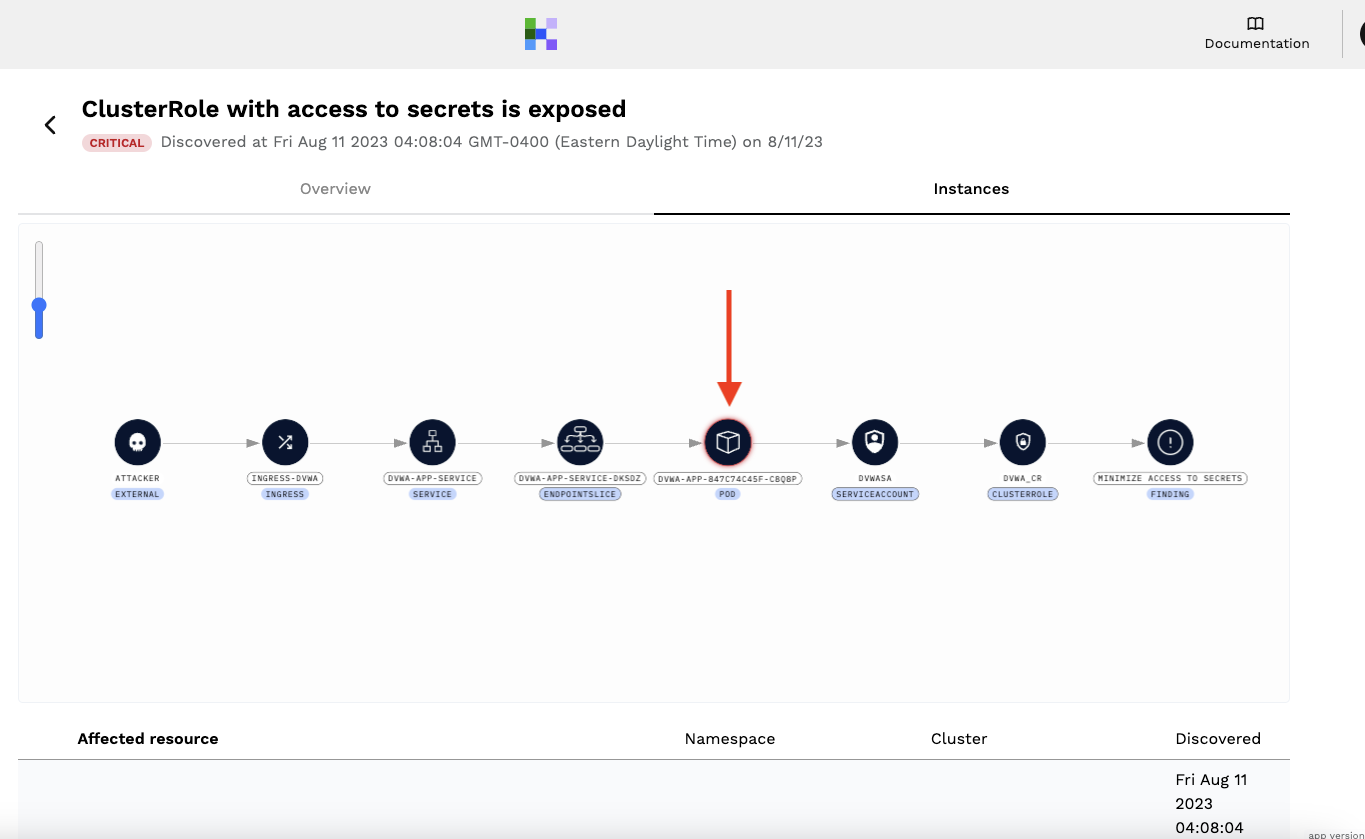
For the External Secrets Store guidance above, here a threat vector is showing us that a cluster role with access to secrets is exposed:
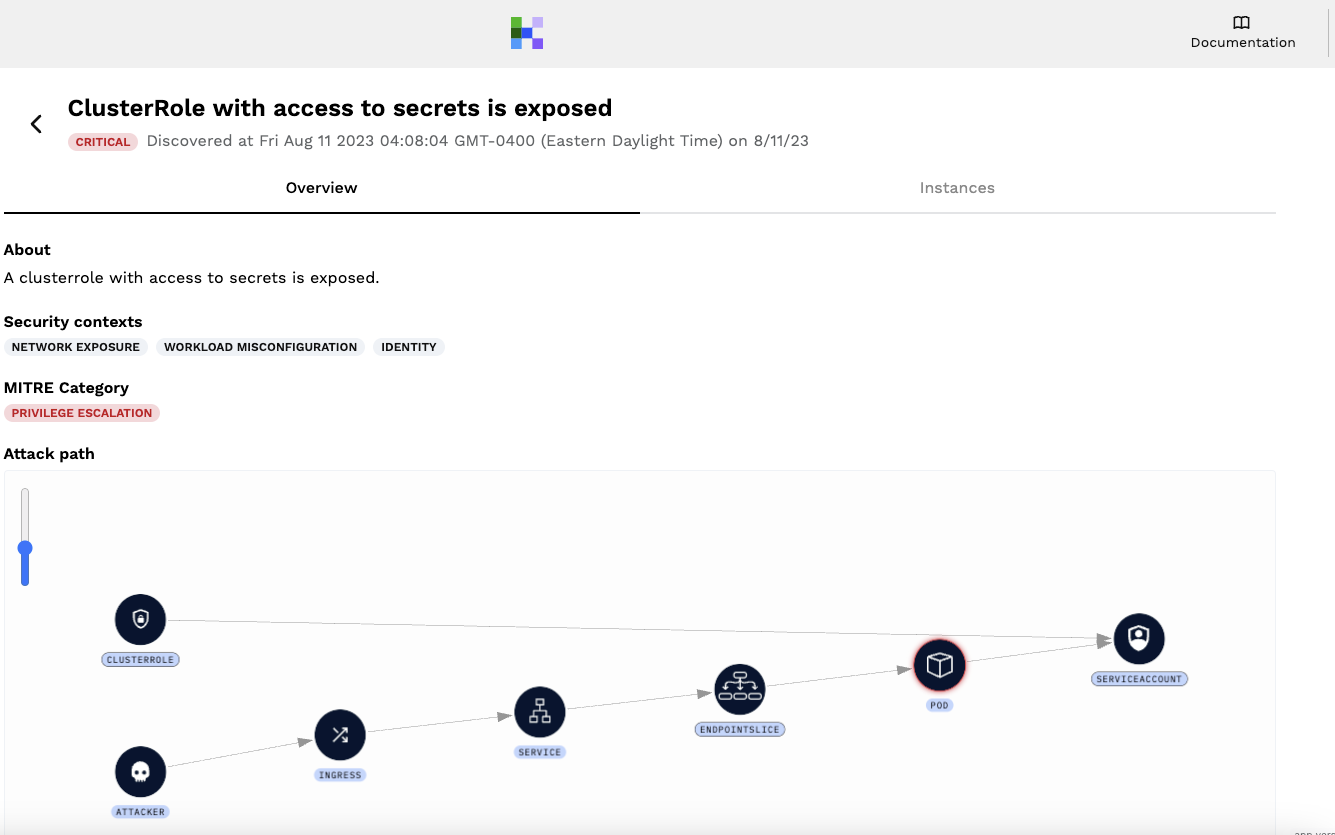
and we can clearly identify the associated pod:
Defense in depth with KSPM clearly involves Kubernetes hardening, as well as elements involved in detection and response for Kubernetes. Combined with admission control and policy changes through Github Actions in the CI, threat vectors and automated risk triage allow you to address Kubernetes security at scale, making an overwhelming security task something that is manageable so you can cover your KSPM bases.
Conclusion
In conclusion, navigating the complexities of Kubernetes Security Posture Management (KSPM) requires a strategic, layered approach that encompasses fundamental hardening techniques, enhanced incident response strategies, and a comprehensive defense-in-depth framework. Each aspect, from addressing common Kubernetes misconfigurations to leveraging advanced features like RAD Security for real-time monitoring and threat detection, plays a critical role in fortifying Kubernetes clusters against an array of cyber threats.
For more KSPM guidance, we recommend learning about how real-time KSPM makes configuration findings actionable through a connection to the Kubernetes lifecycle.
To discuss implementing KSPM with RAD Security, contact us for a demo today!